This guide will show you how to use QuickPwn 2.2 to jailbreak your iPhone. This tutorial is for PC users but I assume the steps are the same on a Mac.
IMPORTANT: READ EVERY SINGLE WORD OF THIS POST BEFORE ATTEMPTING TO JAILBREAK YOUR IPHONE
This QuickPwn 2.2 tutorial will be short as I have already posted a QuickPwn guide before. This guide only shows you how to jailbreak. If you want to learn how to unlock your iPhone 2.2 firmware, please read my iPhone 2.2 QuickPwn unlock tutorial.
IMPORTANT NOTE FROM THE DEV TEAM:
If you are using your iPhone with one carrier and have no interest in the possibility of an iPhone 3G unlock in the near future then just restore or upgrade to 2.2 using iTunes and use QuickPwn to Jailbreak and add Cydia and Installer.
Before doing anything, I suggest you read this important message from the Dev Team.
What does that mean? It means that you can only use this method if you don’t care about unlocking your iPhone in the future. If you’re a “legit” AT&T iPhone user and you have no interest in unlocking your iPhone in the future, then this is for you.
On the other hand, if you’re not a “legit” user or if you do want to be able to unlock your iPhone in the future, then this is NOT for you. If that’s the case, you will have to jailbreak your iPhone using PwnageTool, which will preserve your baseband.
Click here to download the
Note that you are pwning your iPhone at your own risk… Success is not guaranteed!
- Create a folder called “QuickPwn” on your desktop. Download a copy of your iPhone 2.2 firmware from here. Also download QuickPwn 2.2 from here, and the MobileInstallation patch for 2.2 file. Place all these files in the newly created QuickPwn folder on your desktop.
- Unzip QuickPwn.
- Make sure you have downloaded the latest version of iTunes. If you have to update to the latest version of iTunes, I highly recommend you restart your computer after the update. Not restarting my computer after updating iTunes caused me trouble in the past…
- Plug your iPhone and make sure iTunes has detected it. If you’re iPhone is already jailbroken, you may want to remove all the apps that you have downloaded from Cydia. Certain applications such as Winterboard, Categories and more cause trouble. You will be able to reinstall them later. As an alternative solution, you may want to read by post about upgrading a jailbroken iPhone without using AptBackup, which saves your Cydia apps settings. Update or restore your iPhone to firmware 2.2 using iTunes. Restore is preferred as it won’t create any wasted space on your iPhone.
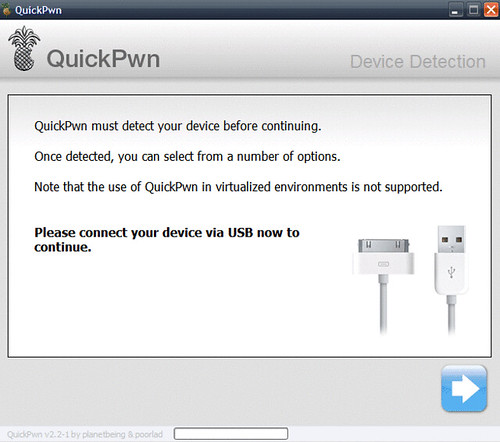
- Right after restoring your iPhone, launch QuickPwn. It should recognize your device automatically.
- You will be asked to select your iPhone firmware. Select the firmware you downloaded in Step 1.
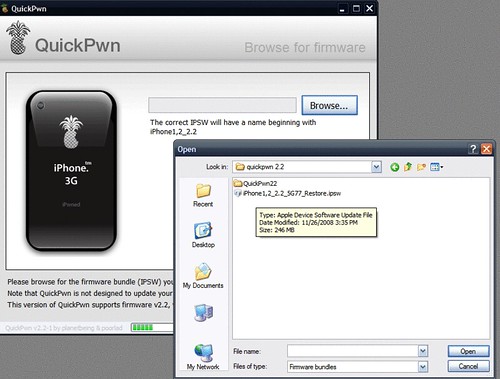
- If the firmware you selected is valid, QuickPwn will show a green checkmark. Click Continue.

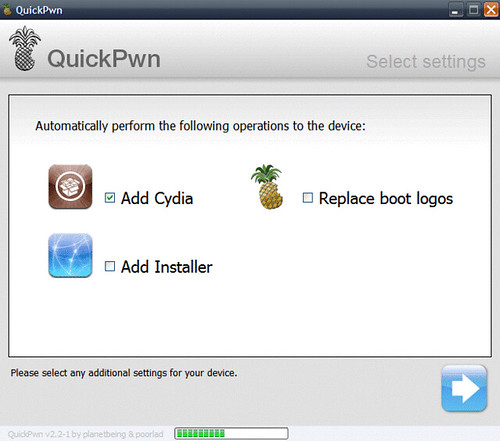
- You will then have the opportunity to select Cydia,Installer, and custom boot logos. You have to at least select Cydia. You may also choose to install Installer .and check to BootLogos box if you want to replace your boot logo. Click Next.
- QuickPwn will now ask you to confirm that your iPhone is connected. Click the blue arrow to continue.

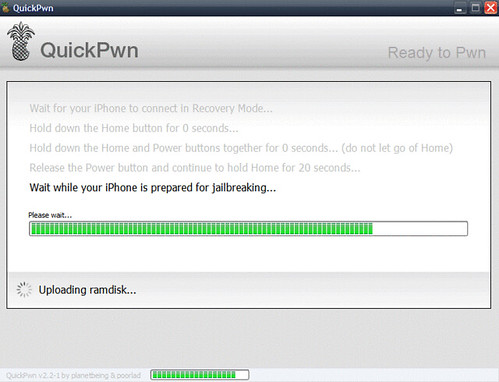
- QuickPwn will now automatically put your iPhone into recovery mode. Once its in recovery mode you will be prompted to: Hold the Home button for 5 seconds, Hold the Home and Power buttons for 10 seconds, then release the Power button and continuing holding the Home button until your iPhone is in DFU mode. Watch the prompts carefully and follow along.

- Once QuickPwn detects your iPhone in DFU mode, it will start the jailbreak process.
- Finally, QuickPwn will let you know that pwnage process was completed successfully.

- Done!
0 comments:
Post a Comment